Bean There, 2026: The Course That Switched My Coffee Brain On
My honest, lesson-by-lesson walkthrough of the day I spent at Bean There Fair Trade Coffee in Johannesburg in 2026 — processing methods, the flavour wheel, the brew ratio formula, and the one habit that saves every home barista.
Key Takeaways
- Order a plain espresso first. Milk hides everything.
- Vanilla in the stream = stop, whatever the timer says.
- Purge the steam wand every single time. Wiping is not enough.
- The brew ratio is universal. The time window is not — 20–30 seconds is commercial; 10–20 seconds is home double-basket.
I took this course at Bean There Fair Trade Coffee in Johannesburg in 2026. This post is my study notes, published openly. If anything here makes you curious, book the course — the live experience is the actual product. — Bibi
How I want you to read this
In 2026 I sat through a one-day course at Bean There Fair Trade Coffee in Johannesburg and walked out with my coffee brain rewired. This post is the curriculum, in the order I learnt it, written for the home barista I was that morning — not the imaginary expert I’m definitely not.
I’m going to use South African English throughout (favourite, colour, realise, flavour). I’ll cite the two diagrams I redrew from my course notes, and I’ll be upfront when something contradicts something else. Coffee is full of that.
Lesson 1 — Processing methods: three roads from cherry to bean
The first thing I had to realise: a coffee cherry isn’t a coffee bean. There’s pulp, parchment, silver skin, and mucilage in between. How a farm strips those layers determines almost everything about what’s in your cup.
- Fully washed. Every layer comes off. Beans ferment in water for 48–72 hours, then dry. This is the everyday cup. Clean, balanced, predictable. It’s what I drink eight to twelve cups of, most days.
- Natural. Whole cherries are dried with the fruit still on, then milled. Two to three weeks of drying, turning the beans, covering them at night. The result: fruity, boozy, sometimes wine-like. A signature coffee for a special morning, not your daily flat white.
- Semi-washed / Honey. Only the outer skin is stripped. The sticky mucilage layer stays on while the bean dries. The dominant tasting note you’ll hear, predictably enough, is honey.
There’s a less romantic detail my instructor mentioned: the defective cherries that float to the top during sorting? Some companies buy those cheaply and quietly blend them into supermarket coffee. If you’ve ever wondered why a R45 supermarket “premium blend” tastes like dishwater, that’s part of the answer.
Lesson 2 — Q Graders, parchment, and the potato defect
A Q Grader is the coffee equivalent of a sommelier — a certified, professional taster who can blind-identify origin and quality. They work in groups of at least three, because tasting alone is unreliable.
In South Africa, this is still a tiny club. Five years ago there were only three Q Graders in the country. Now we’re at six or seven. I quietly told myself that morning I’d one day be the eighth. Still working on it.
A practical horror story from this lesson: the potato defect. A single off bean can ruin a portafilter. The catch is, you can’t smell it on the green bean — it only emerges when the bean is ground or brewed. If your espresso suddenly smells like a raw, earthy potato cellar, chuck that dose and start again.
Lesson 3 — Green beans, fermentation, and the Kopi Luwak ethics question
Green beans look like little hard seeds. They smell faintly earthy and nothing like coffee. All the magic is dormant until the roaster wakes it up.
In washed processing, fermentation is a tightrope: too short and the mucilage clings, too long and you get rotten, fungy notes. My instructor told a story of someone who deliberately fermented beans for over six months, then roasted and sold them at a premium. Acquired taste, apparently.
The most expensive coffee in the world is still Kopi Luwak — coffee cherries eaten and excreted by a civet (or, in newer iterations, by elephants, monkeys, even cats). I paid R85 for a single espresso of it in Cape Town once. I’ll be honest: it tasted horrible. Maybe my expectations were too high. Maybe the ethics — caging and force-feeding the animals — had soured the cup before I tasted it. Probably both.
Lesson 4 — How I judge a coffee shop in one sip
The single most useful tip from the course: order a plain espresso first.
Milk is forgiving. It hides poor extraction, stale beans, dirty equipment. A plain espresso has nowhere to hide. If it’s good — bright, balanced, with a thoughtful aftertaste — the rest of the menu is probably good too. If it’s bitter and ashy, the latte you were going to order is just going to be milk politely disguising the same problem.
Quick note on harvesting: handpicking selects only ripe red cherries. Tree-shaking collects everything — ripe, green, overripe, and the small mammal that just happened to be sitting on the branch. Brazil is the world’s number-one green-bean exporter largely because they shake. There are wonderful single-origin Brazilians, but the global rank is about volume, not quality.
Lesson 5 — Origins, varieties, and the flavour wheel
Coffee needs warmth, rainfall, and altitude. The good stuff almost always grows above 1 000 metres.
There are two species that matter:
- Arabica. Slower-growing, more complex, the engine of specialty coffee.
- Robusta. Faster, higher in caffeine, lower in acidity, one-dimensional. Most of it ends up in instant coffee and supermarket blends — sometimes 70 to 90 percent Robusta hiding behind a “pure coffee” label.
This is where the language gets serious. The course introduced the tool that every cupping session uses to put a name to what you’re tasting — the Coffee Taster’s Flavour Wheel:
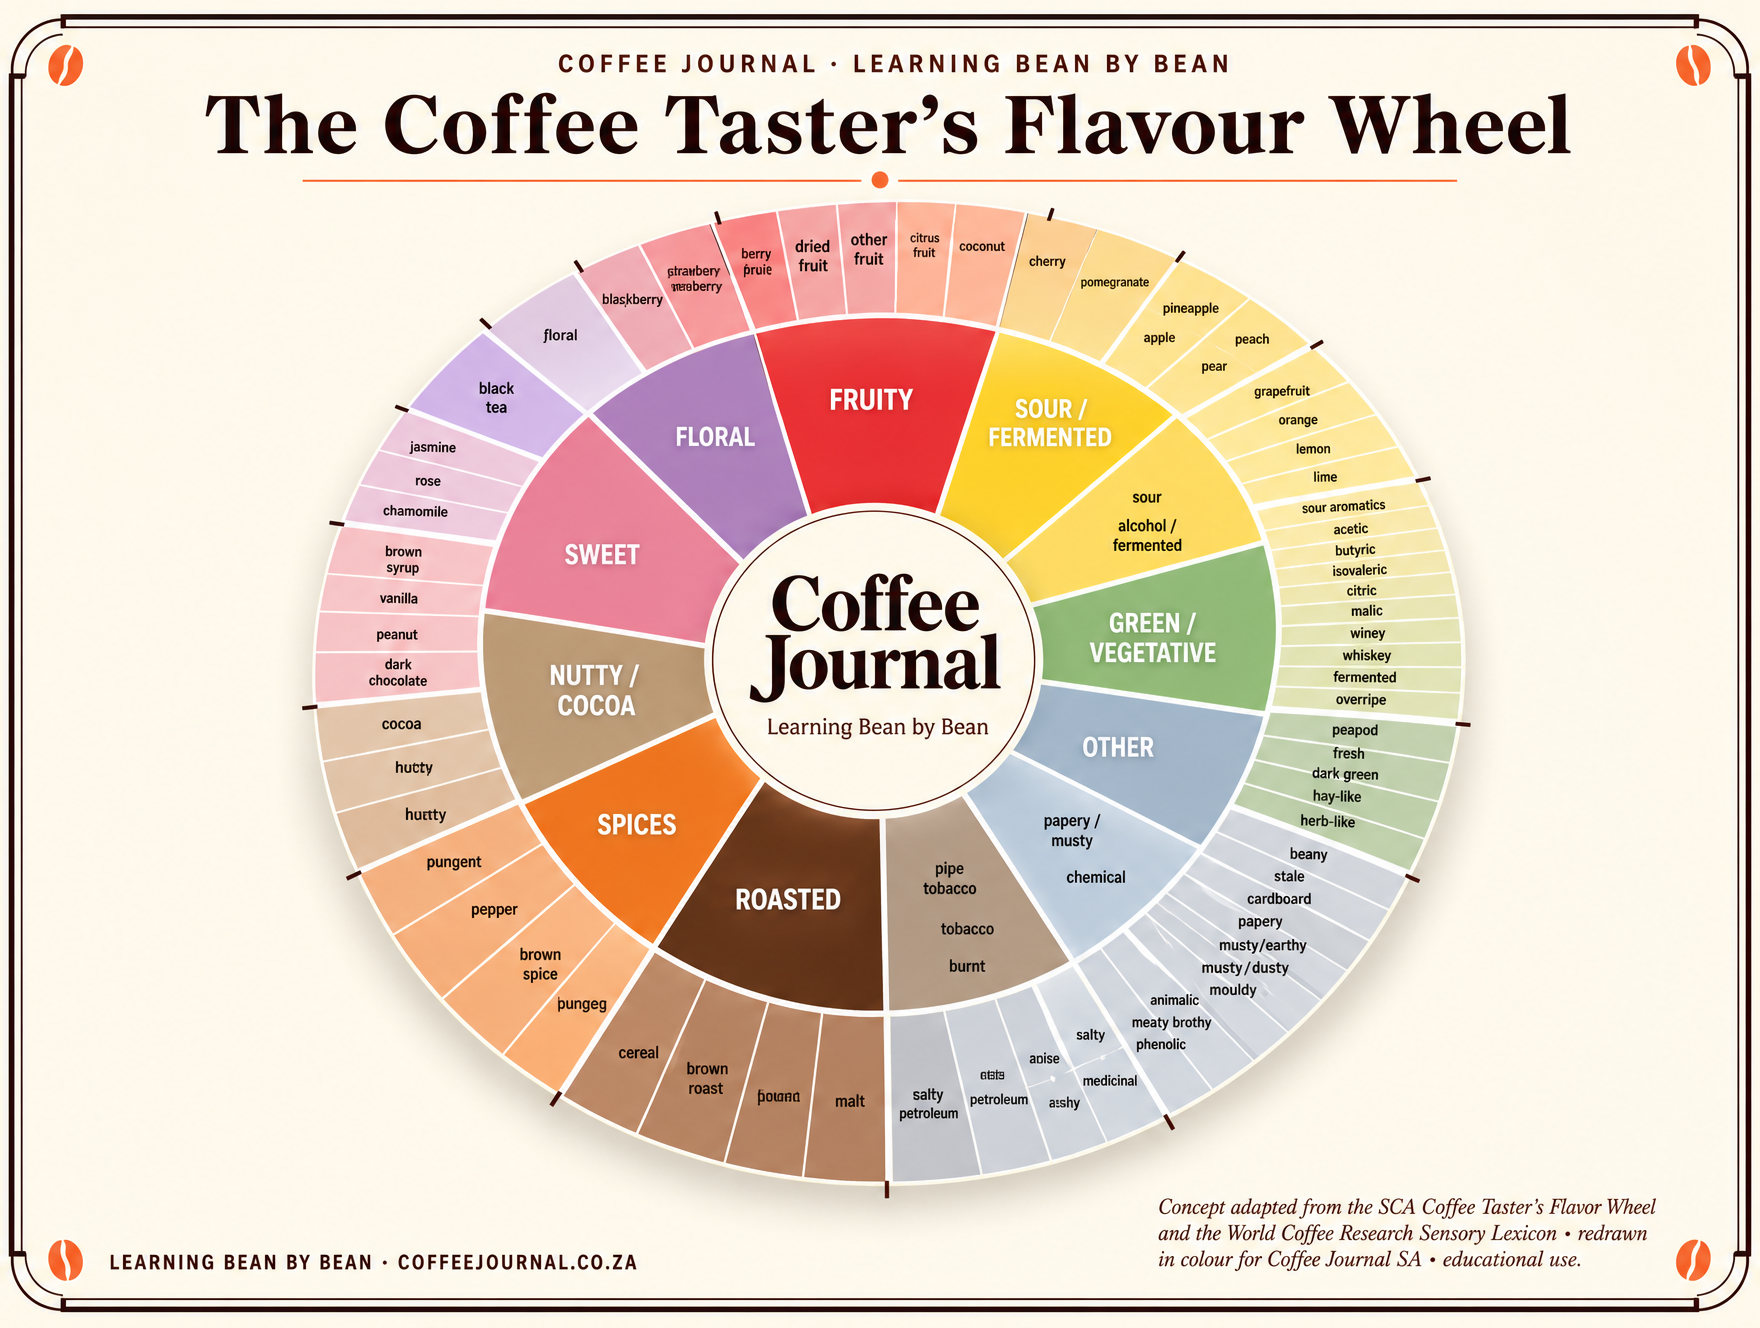
Figure 1 — Coffee Taster’s Flavour Wheel, Coffee Journal SA edition. Concept adapted from the SCA Coffee Taster’s Flavor Wheel and the World Coffee Research Sensory Lexicon; redrawn in colour for Coffee Journal SA under fair educational use.
💡 Want to explore the wheel without a print copy? Open the interactive version — hover or tap a wedge and the descriptors light up.
You read it from the inside out. Fruity is broad. Berry is narrower. Raspberry is the specific descriptor you’d write on a tasting form. The question on the cup table moves from “is this nutty?” to “is this almond, hazelnut, or peanut?” The rabbit hole starts here.
Lesson 6 — Machines, and a small dream of a coffee van
A La Marzocco is the Ferrari — beautiful, expensive, faster pulls. The Casadio my instructor used was, in his words, the Porsche 918 — still extraordinary, just with a different temperament. Both can pull a great shot if you know what you’re doing.
For mobile and outdoor work — markets, festivals — you want a machine that can be converted to gas: Vegas, Casadio, Aquila. That’s the dream I quietly built that day. I keep telling myself I’ll retire one day into a coffee van, parked somewhere with a view, giving most of the coffee away. The instructor reckoned R80 000 to R100 000 to build, with a one-to-two-year payback at current cup prices. A black coffee is almost R50 now. With almond milk it’s R60–65. People keep buying it. So would I.
Lesson 7 — Bar hygiene and the one habit that saves you
The bar setup needs three cloths minimum:
- A pre-wet cloth dedicated to wiping the steam wand of milk.
- A dry cloth for the drip tray and surfaces.
- A dry cloth for the inside of the portafilter (this one must never get wet).
The single most important habit on this bar: purge the steam wand after every milk-steam. Not wipe. Purge. Milk left inside the wand turns into bacteria. The wand will eventually block — and one day, somebody’s child will drink a cappuccino that makes them sick.
I once watched my instructor try to figure out why a steam wand was barely working. The pressure gauge read 1 to 1.5 bar, but almost nothing came out. The nozzles were blocked with weeks of milk residue. The barista had been wiping. He had not been purging. Don’t be that barista.
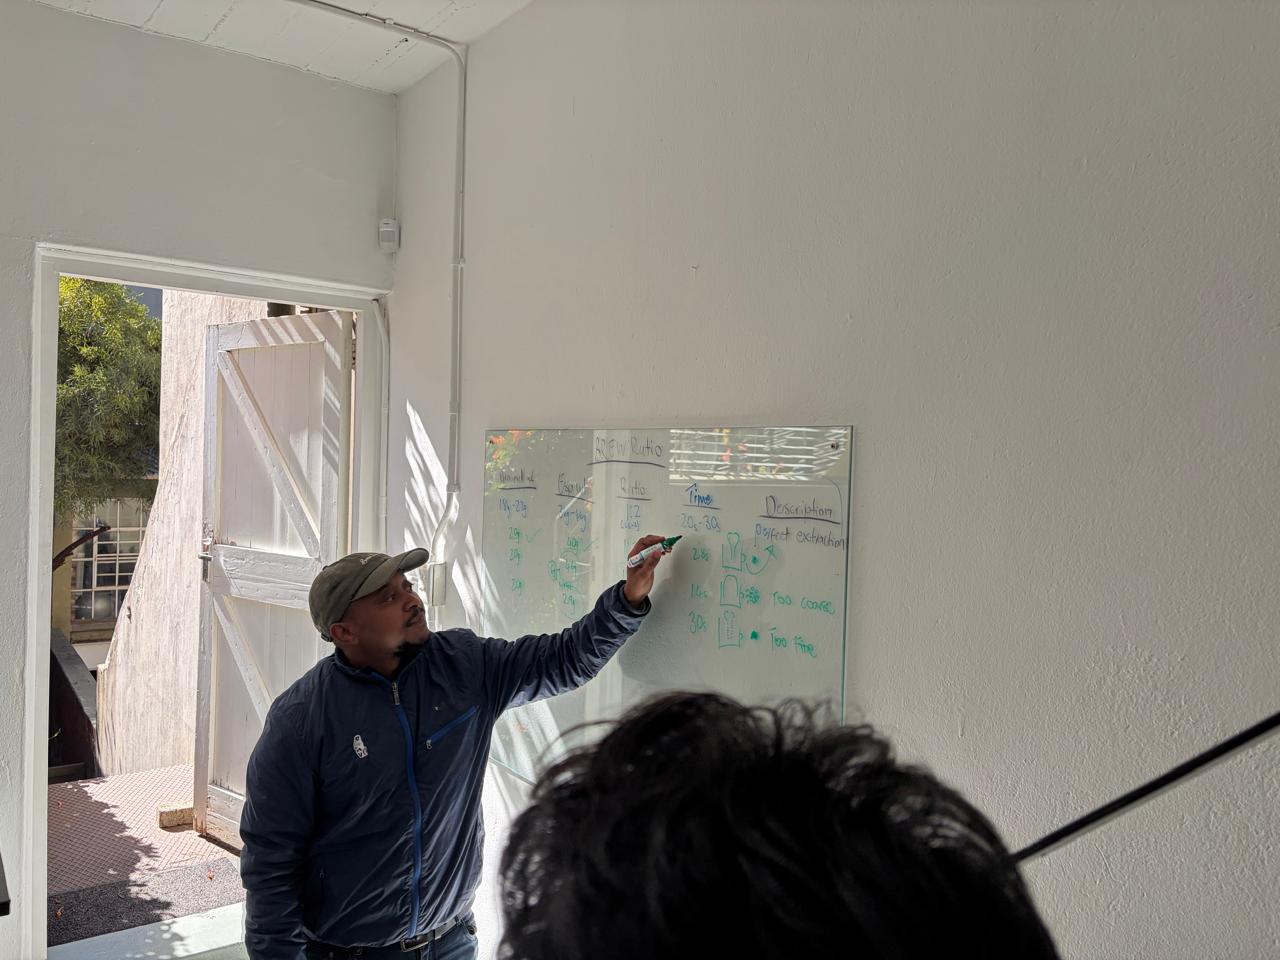
Lesson 8 — The brew ratio formula
Every consistent espresso shot in the world is built on the same formula. My instructor drew it on a whiteboard. I redrew it for the journal:
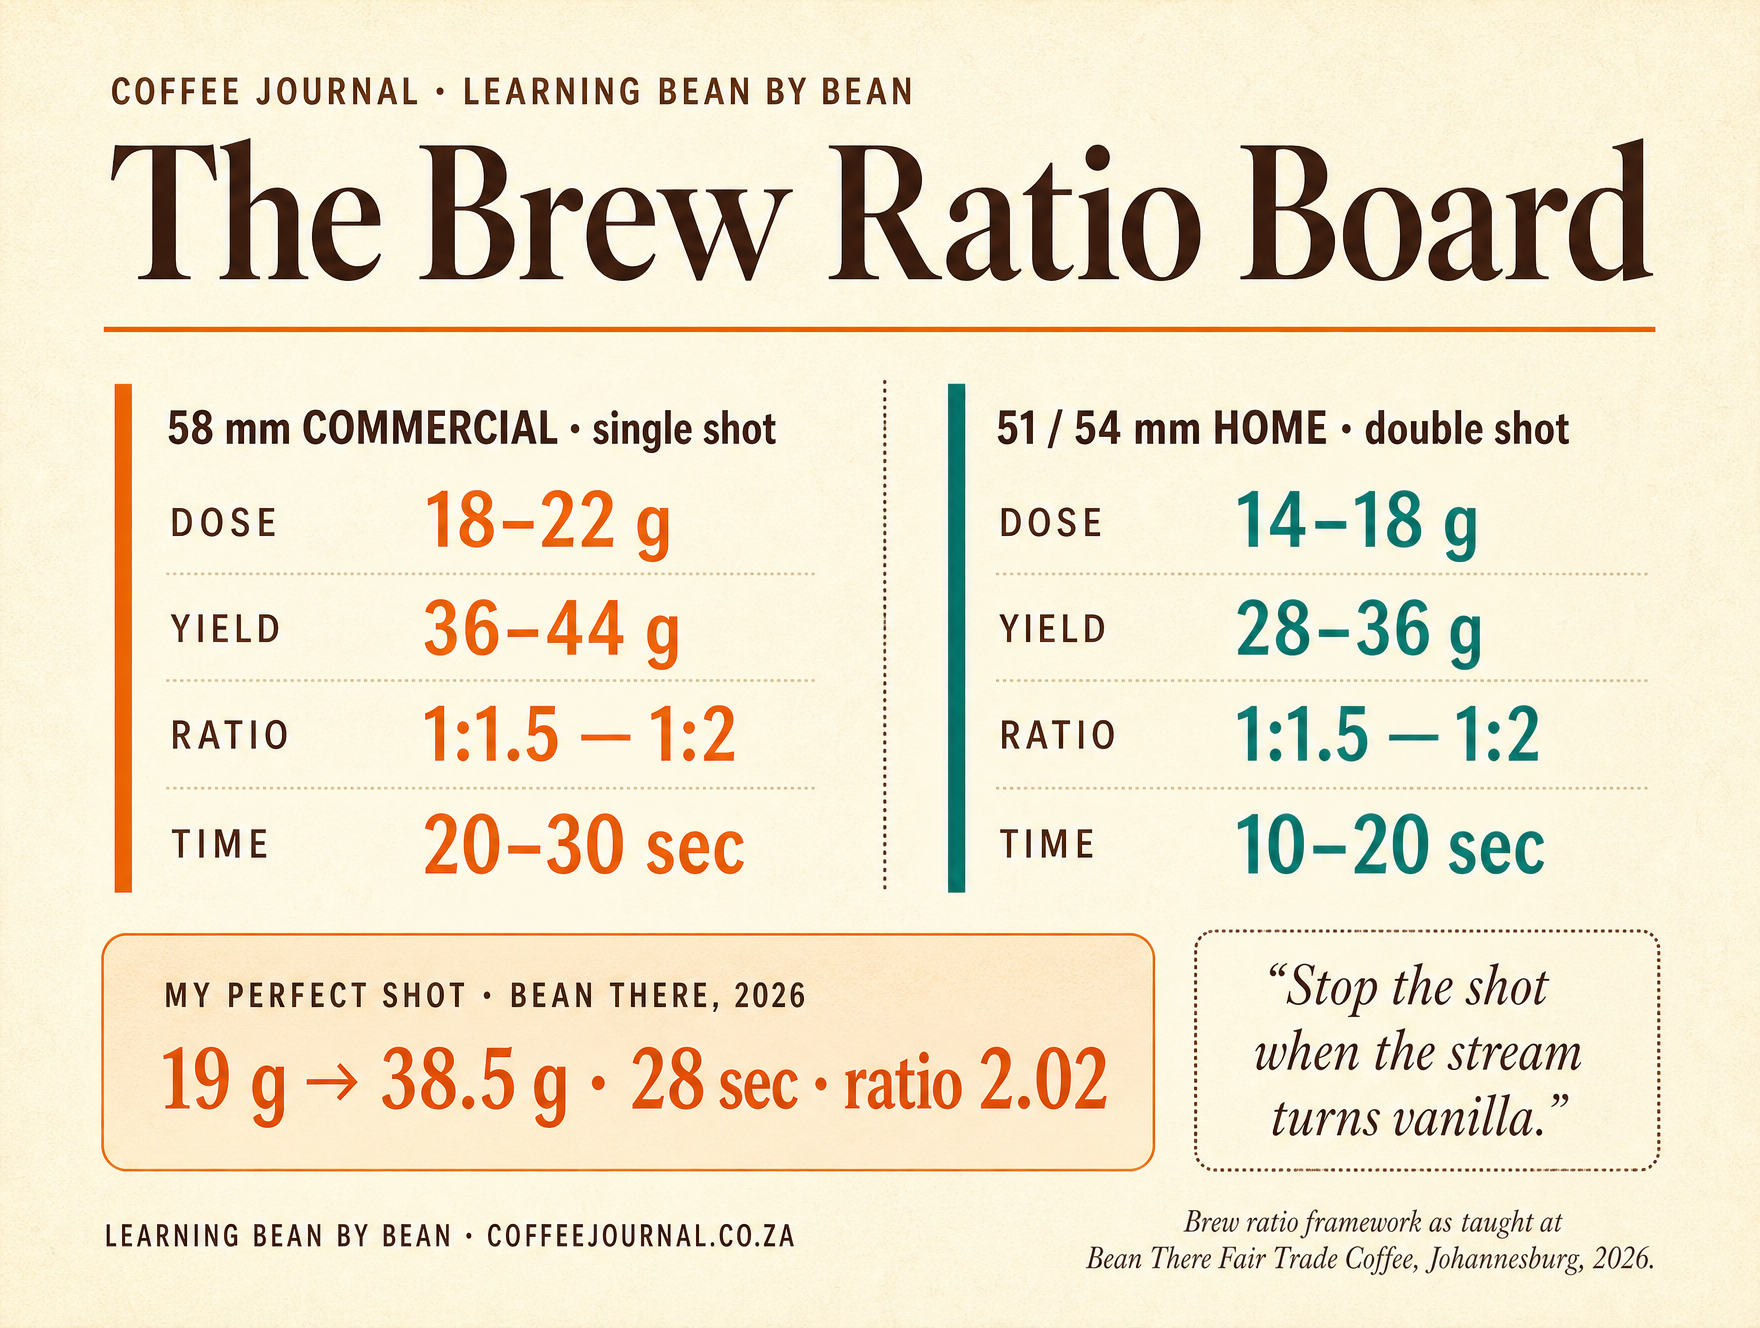
Figure 2 — Coffee Journal Brew Ratio Board. Brew-ratio framework as taught at Bean There Fair Trade Coffee, Johannesburg, 2026.
For a 58 mm commercial portafilter (single basket):
- Dose: 18–22 g of ground coffee
- Yield: 36–44 g of espresso
- Ratio: 1:1.5 to 1:2
- Time: 20–30 seconds
But — and this is the bit nobody told me before that day — if you’re at home with a smaller 51 mm or 54 mm basket (a De’Longhi, a Breville, a Sage), and you’re pulling a double shot through it, you should be looking at 10–20 seconds, not 20–30. The 20–30 rule is for single shots on a commercial portafilter. Apply it to your home double basket and you’ll over-extract every time.
Two more rules worth pinning up:
- The timer starts when you press the button, not when coffee appears.
- When the stream turns vanilla (pale, blonde), stop. Whatever the timer says.
My target shot from that day, the one that finally clicked: 19 g in, 38.5 g out, 28 seconds, ratio 2.02. Creamy, balanced, sweet. I keep that number in my head.
💡 Try it yourself: Open the Brew Logger — the stopwatch, live ratio, and coaching verdict will tell you exactly where your shot lands.
Lesson 9 — Diagnosing shots: too fast vs too slow
The brew ratio gives you a diagnostic kit:
- Too fast: your 20 g dose hits 46 g in 14 seconds. Ratio 1:2.3. Watery, thin, weak. The grind is too coarse.
- Too slow: your 20 g dose only produces 29 g in 30 seconds. Ratio 1:1.4. Drip drip drip. The grind is too fine.
One nuance: if your shot is dripping for more than about 12 seconds before any real flow starts, something is wrong. Either the grind is too fine, or you’ve tamped too hard.
Lesson 10 — Tamping, distribution, and pulling the shot
This is mechanical, so I’ll keep it tight:
- Distribute first. A distribution tool levels the grounds in the basket before you tamp.
- Tamp like a torch. Hold the tamper like you’re holding a torch. Your arm should make a 90° angle at the elbow.
- Two fingers rest on the edge of the basket to feel for level.
- Press straight down with arm pressure only. No body weight. No twisting motion at the end — that’s channelling, and it ruins shots.
- Clean the ears of the portafilter. Flush the group head. Engage the portafilter within about four seconds of the flush.
While the shot pours, watch the colour: honey → caramel → vanilla. When you see vanilla, stop. After the shot, knock out the puck. A solid, dry puck is a good shot. A soupy puck means your grind is wrong.
Lesson 11 — Ristretto, lungo, perfect: three shots, three palates
We tasted three shots side by side. I think this was the single most useful exercise of the day.
- Sample B — Ristretto (17 seconds). Sharp, bright acidity. This is what you want underneath a flat white — it’s the acidity that cuts through the milk.
- Sample C — Lungo (40–42 seconds). Way too much water pulled through. Thin, sour, light. My instructor said it tasted like dishwasher water. He’s not wrong. Never serve a lungo.
- Sample A — Perfect (26 seconds). Balanced. Sweet. A “good bitterness” — the kind that makes you want a second sip. This is the target for a cappuccino, a latte, an Americano.
Until you’ve tasted those three side by side, the words “balanced espresso” don’t mean much. After you’ve tasted them, you can’t unhear the difference.
Lesson 12 — Live dial-in (or: why your grinder lies to you a little)
We spent an hour dialling in the grinder for a single-origin Ugandan, medium roast. What I learnt that I didn’t expect:
- Finer grind = denser grounds = less weight per grinder pulse. Make the grind finer and you may need to increase the grind time to hit the same dose.
- Micro-adjustments beat big jumps. Move the dial from 6.5 to 6.4, not from 6.5 to 6.0.
- The day gets warmer; the beans dry; the dose drifts. A grinder set to dispense 20 g at 8 am may dispense 21 g by noon. Weigh every dose if you’re paying attention.
My instructor put it well: there’s the mathematics and science of the formula, and then there’s the art of execution and taste. You need both. And the rabbit hole, as one of the other students put it, “just becomes deep.”
💡 Need grinder-specific settings? The Grind Size Guide has measured micron values for 14 popular grinders.
Lesson 13 — When the power’s out: pour-over and plunger
Two methods I now use at home:
- Pour-over (V60, Chemex). Coarser grind than espresso. Bloom the grounds for 30 seconds with a small first pour, then pour in slow circles. Filter ratio is 1:15 — 15 g of coffee for 250 ml of water, or 60 g for a full litre.
- French press / plunger. Even coarser. Steep for 4 minutes. Press slowly. Don’t over-press.
💡 Brewing without power? Read the full Load-Shedding Coffee Guide.
Lesson 14 — Milk: the bit most home baristas burn
- Insert the wand only about 0.5 cm into the milk, slightly off-centre. You want a vortex.
- Stretch first — the “tick-tick-tick” sound is air being incorporated. Stop stretching when the jug is warm to the touch (about 45°C).
- Then submerge slightly deeper to heat. The noise should stop. This stage should take less than 10 seconds.
Target temperature: 65°C. When the jug is too hot to hold for more than two or three seconds, you’re there. Above 70°C, you’ve burnt the milk. Sweetness gone. Customer’s tongue burnt.
For “extra hot”: stop at 70°C, then let the wand run for another five seconds with your hand off. You’ll preserve sweetness while bumping the temperature.
For almond, oat, soy and other plant milks: stop earlier, around 55–60°C.
Key takeaways, for the home barista I was at 8 am that morning
- Order a plain espresso first. Milk hides everything.
- Vanilla in the stream = stop, whatever the timer says.
- Purge the steam wand every single time. Wiping is not enough.
- The brew ratio is universal. The time window is not — 20–30 seconds is commercial; 10–20 seconds is home double-basket.
- 19 g doesn’t fit every bean. Use the formula as a target, not a religion.
- Don’t store coffee in the fridge. Moisture and odour absorption ruin it. A cool dry cupboard is fine.
- Dark shiny beans are a warning, not a flex. The oils are out because the bean is over-roasted.
- The rabbit hole has no bottom. That’s the point.
A note on where this knowledge came from
I learnt all of this at Bean There Fair Trade Coffee, Johannesburg, in 2026. I paid for the course. I’m publishing my notes openly because that’s what Coffee Journal is for — but the live course is where the real teaching happens. Recipes are written down. Palate training, technique, and the dozen tiny corrections an instructor gives you in person are not.
If you live in or near Joburg and any of this stirred your curiosity, book the course. The instructor is Marcus — tell him Bibi sent you. They run it. I’m just the student writing it down.
Credits and licensing
- I took this course at Bean There Fair Trade Coffee, Johannesburg, in 2026. Course content and the brew-ratio framework belong to Bean There.
- The Flavour Wheel is a Coffee Journal SA edition. Concept adapted from the SCA Coffee Taster’s Flavor Wheel and the World Coffee Research Sensory Lexicon; redrawn in colour for Coffee Journal SA under fair educational use.
- Interactive flavour wheel build: Coffee Journal SA original.
Coffee Journal SA · Learning Bean by Bean · coffeejournal.co.za
Keep Reading

About the author
Bibi Burness, founder of Coffee Journal, has profiled 50+ SA specialty roasters and tested 10+ bottled water brands against the SCA standard. He completed the Bean There and Bluebird one-day home-barista courses in 2026 and maintains the site's transparency trust-score system.
Read more on the About page →